These days vendors are increasingly integrating packet sniffing tools into their products. Since there are many APs out there with a higher count of internal radios than their USB dongle counterparts it actually makes allot (if not the only) sense to use an AP for the sniffing job. The previous statement is true only if you're capturing frames from a 3x3 or higher AP otherwise a proper USB dongle could be used.
This post (more of a how-to than a post) will show you how to capture packets from a Ruckus Wireless (RW) AP either in stand-alone or a ZD controlled mode. For this you will require:
- An RW AP - any recent will do
- A ZD, but it works without it also
- Wireshark
The first thing to do is to put your APs radio into monitor mode or as RW calls it "capture" mode. You can do that in 2 ways. You either SSH to an AP and enable it there, or if the AP is ZD controlled you can enable it via the ZD web GUI. Doing it via ZD you can probably do it faster, but you can't set all of the available options that way.
The other thing is to setup you Wireshark to capture frames from the network connected AP.
The other thing is to setup you Wireshark to capture frames from the network connected AP.
SSH to the AP and enable capture mode
Logging in is easy. You need to know the APs IP address and login credentials. Once in the CLI enable the capture mode for which you have 2 options.
- stream mode where you stream the frames directly to Wireshark
- save mode whit which you save a finite amount of frames and send them via TFTP
Since APs can have 2 radios you need to specify which radio should be configured for capture. Each radio has one monitor (MON) interface. You can get a list of interfaces that an AP supports with the command
# get wlanlist
which in the case of a dual-band AP produces something like this

Here you can see the AP has 2 monitor interfaces (MON) you can use to capture on:
- wlan100 is on the 2,4GHz and
- wlan101 is on the 5GHz radio
Here's the capture command in full
set capture <wlan name> {idle|[stream|local][-no[b][c][d][p]] [showLDPC]}
-> -nob: nobeacon
-> -noc: nocontrol
-> -nod: nodata (not implemented yet)
-> -nop: nopromiscuous
-> -no[b][c][d][p]: any combination
example: set capture wlan100 stream-nobcp
-- Set Packet Capture state/filter
So you have various options you can enable. Mostly you can disable some types of frames to be sent over the wire if you wish, but you can filter those out even later via Wireshark filters. So to get started quickly just input the following
# set capture wlan10x stream
where x is either 0 or 1, depending on the band you wish to capture on.
The CLI command for this is the following
set channel <wifi name> {<channel>|auto}
-- Set the radio channel
Again on a dual-band AP you set the channel for each radio separately. For example if you would like to set the 2,4GHz radio to channel 3 (2422MHz) you would do the following
set channel wlan100 3
OK
Then check with the following
get channel wlan100
wlan100 Channel: 3 (2422 Mhz) (Manual Channel Select)
OK
where x is either 0 or 1, depending on the band you wish to capture on.
Setting the channel on stand-alone APs
When capturing on stand-alone APs the channel will change periodically so you will probably want to lock the AP on a particular channel while capturing.The CLI command for this is the following
set channel <wifi name> {<channel>|auto}
-- Set the radio channel
Again on a dual-band AP you set the channel for each radio separately. For example if you would like to set the 2,4GHz radio to channel 3 (2422MHz) you would do the following
set channel wlan100 3
OK
Then check with the following
get channel wlan100
wlan100 Channel: 3 (2422 Mhz) (Manual Channel Select)
OK
Setting capture mode of a ZD controlled AP
The other way to setup capture on an AP or a group of APs is to do it over the ZD interface. For this you do the following
1. Go to Administer :: Diagnostics and enable capture on selected band and APs and Add to capture APs list

2.Once APs are in capture list choose either "Streaming" or "Local" mode and click "Start"

Next comes the Wireshark part.
1. Go to Administer :: Diagnostics and enable capture on selected band and APs and Add to capture APs list
2.Once APs are in capture list choose either "Streaming" or "Local" mode and click "Start"
Next comes the Wireshark part.
Setting up Wireshark
Now that you've got your AP setup you need to get your Wireshark up and running which involves quite a few steps.
1. Configure capture options by clicking on the icon or hitting CRTL+K
2. Click on the Manage interfaces button to configure the Remote interfaces.


NOTES
1. Only one of the two available monitor interfaces can be active at one time.
2. An SSID must be configured for operation, although broadcasting of the SSID can be suppressed.
3. You can stream packets only to a Windows machine since it uses winpcap that allows for this.
1. Configure capture options by clicking on the icon or hitting CRTL+K
2. Click on the Manage interfaces button to configure the Remote interfaces.
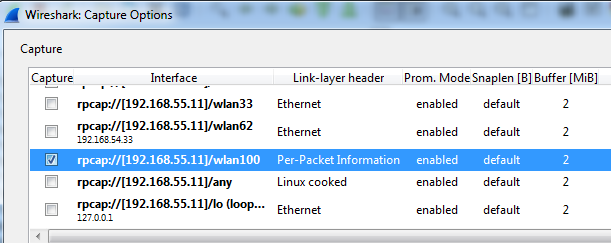
3. Click Add and input the APs IP address and OK it. You will see a list similar to the one below
Now select all the check boxes on the right except the wlan100/wlan101. This will hide all the interfaces except that one. Since it's the only one to capture on it makes sense to do it, however it's optional and you can leave everything visible.
4. Now click Apply and then Close
5. Now select wlan100/wlan101 and click either Start or Close. If you close at this point you will start a capture with CTRL+I and select the interface to start the capture on.
Hooray packets
NOTES
1. Only one of the two available monitor interfaces can be active at one time.
2. An SSID must be configured for operation, although broadcasting of the SSID can be suppressed.
3. You can stream packets only to a Windows machine since it uses winpcap that allows for this.
Not bad, ZD bi lahko zapisal kot ZoneDirector, sem že premišljeval, o katerem zdravstvenem domu je govora... ;)
ReplyDeleteThanks for this useful post.
ReplyDeleteCan I understand little more on how this streaming mode works? Can multiple machines with wiresharks running, hook onto one Ruckus AP & get to see same packet capture?